Did you know that the earliest cutting implements used by humans appeared at least 2.6 million years ago? These were simple stone tools, such as choppers and scrapers, known as the Oldowan tools. Archeologists believe our prehistoric ancestors used them for hunting meat and cutting plants.
Today, kitchenware, including cooking tools like knives, has become a $62 billion industry.
If you’ve picked up home cooking yourself, knives were likely some of the first things you bought. After all, you won’t even be able to prepare food, much less enjoy a meal, without these cutting tools.
However, while all knives are sharp when new, most of them go dull after weeks of use. That’s why you need to know how to bring them back to their former glory.
We’ll share some of the top knife honing and sharpening tips every home chef needs to know, so be sure to read on.
Understand Why Knives Become Dull
The harder the surface a knife’s edge comes into contact with, the more misaligned the blade gets. The naked eye may not see this, but a blade that has lost its alignment can look wavy instead of straight. So, even if the edge is still looking sharp, the misalignment makes it harder for the blade to go through food.
Worse, the more difficult it is to cut with the knife, the more pressure you’d need to exert. At the very least, you’ll tire faster, especially if you need to prepare many ingredients.
What’s more, health experts say that dull knives can be more dangerous than sharp ones. That’s because the more pressure you place on the tool, the higher the risk of it slipping. This may then result in injury-causing accidents.
For that reason, please don’t use your knives on surfaces harder than their blades. Ceramic, glass, marble, porcelain, and stone surfaces are your knives’ worst enemies. Instead of using your knife skills on these, always use a plastic or wooden chopping board.
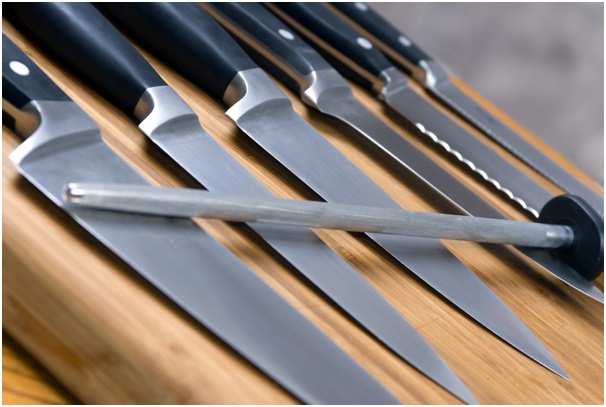
Hone Them
If you purchased a knife set, it likely came with a honing rod, also known as honing steel. Contrary to popular belief, these steel, wand-like tools don’t sharpen knives. Instead, they correct slight misalignments to the blade.
Each time you glide a knife against a honing rod, the steel pushes back the blade into its proper position. That’s why honing makes slightly dull knives seem sharper. For the same reason, you should hone your knives often; you can even do it before every use.
Honing is also crucial, if not more so, for the best kitchen knives. After all, the better the knife, the more likely and more often you’ll use it. So, with the help of proper honing, you can make your blades last longer, and you may not need to sharpen them as often.
Proper Way to Hone a Knife
A honing rod’s proper, safe use is to direct its tip away from you and anyone else. So, planting the steel vertically on a surface may be your best bet. This way, both the rod and the knife will face downward.
From there, position the blade’s heel against the top of the rod, with the knife tip slightly facing upward. Make sure the knife is at a 15-degree angle away from the steel wand.
Then, applying only light pressure, slide the blade down the steel’s entire length in one sweep. Make sure to pull the knife toward you so that the blade’s center reaches the rod’s middle section. Finish up by grazing the tip of the blade down the lower section of the wand.
Repeat the steps on the other side of the blade. Four to five alternating strokes on each side should do the trick.
Invest in a Whetstone
Whetstones, also known as water stones, are block-like stones designed for knife sharpening. One side of these bars uses coarse grit, while the other consists of finer grit. Each side also has a number that corresponds to the grit’s coarseness.
The lower the number, such as anything below 1,000, the coarser the grit. This range is often for sharpening roughened blades, like those with chipped edges.
On the other hand, a grit that ranges from 1,000 to 3,000 can sharpen dull but smooth blades. Anything higher than this is usually for polishing and refining edges.
If you can make honing a frequent habit, a whetstone with a 700 to 1,200 grit range may be enough.
The Right Way to Sharpen Your Knife With a Whetstone
To sharpen your knife with a whetstone, soak the stone in clean water for about 10 to 15 minutes first. Then, place the block on a piece of towel to stop it from moving and sliding. The slab’s coarser-grit side should be the one facing upward.
If you have a European knife, position its blade at a 20- to 25-degree angle toward the tip of the stone farthest from you. If it’s a Japanese-style tool, 15 degrees may be more appropriate. Check the knife’s manual if it came with one for specific angles.
Next, hold your knife firmly and draw it toward you. The grinding should start from the heel, and as you pull the blade down, its tip should graze the bottom of the stone. Repeat these steps at least ten times on each side, and make sure you switch from one side to the other.
You can then flip the stone to its finer-grit surface and repeat the steps to polish your blade. You can then wipe the knife and test its blade. You can try your newly-sharpened knife on a piece of paper or tomato.
Make Your Cutting and Cooking Tools Last Longer
Keep in mind that good-quality knives, so long as cared for properly, can last almost a lifetime. Honing and sharpening your knives, therefore, should be a top priority.
So, starting today, give our tips a try and incorporate them into your life as a home cook. This way, you can lengthen the life of your essential cutting and cooking tools.
Looking for more cooking tricks that can help you create gastronomic delights? Check out our latest guides for other inspirational ideas then!